Ricciarelli

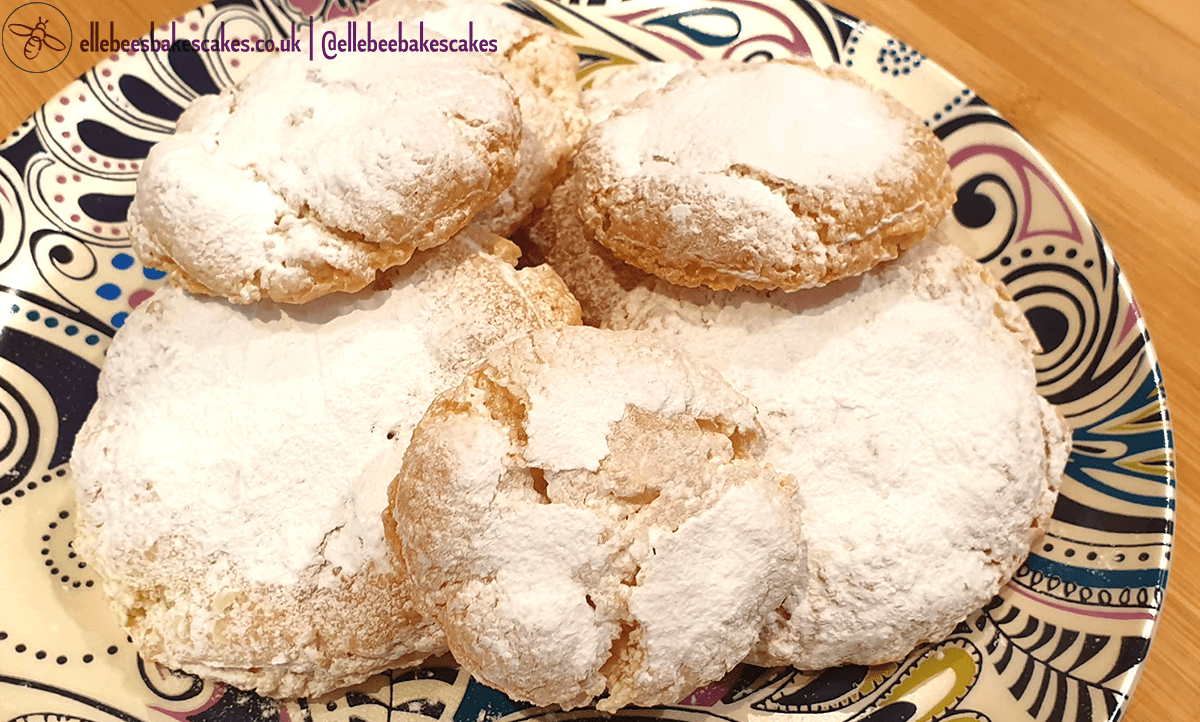
Ricciarelli are an Italian almond crinkle cookie originating in Siena, usually eaten around Christmas but I like to enjoy them all year round. I’ve had the pleasure of visiting the shop where ricciarelli were originally made.

This recipe makes 15-20 biscuits. This is a very messy recipe so be prepared, however the soft-yet-firm, chewy, ricciarelli are worth it.

Ingredients

  • 2 egg whites (approx. 65g)
  • 200g icing sugar, plus extra for dusting
  • 200g ground almonds
    • If you can’t find ground almonds, you can blitz blanched whole almonds with a food processor
  • 2tbsp almond extract
  • 1 tsp vanilla paste
  • 1 orange, zested

Process

  1. Whip the egg whites with squeeze of orange juice to stiff peaks at a high speed
  2. Fold in icing sugar and ground almonds until combined
  3. Fold in almond extract, vanilla paste, and orange zest until combined
  4. Cover bowl with cling film and pop in the fridge for a minimum of 4 hours or overnight.  The longer it is left, the better.
  5. Preheat oven at 140C fan assisted.  Prepare a baking tray with baking parchment or a silicone mat.
  6. Cover work surface with dusting of icing sugar and turn out the dough.  Roll it in to a long skinny sausage about the circumference of a 2 pence piece (this is about 2.5cm, or an inch).
    • The dough is going to be very sticky.  I found it best to wear powder-free latex/vinyl disposable gloves when working with the dough
  7. Cut the dough sausage into pieces about the same width as the circumference.  Roll into a sphere-like shape and place on the baking tray, flattening it slightly.  Place each ricciarello with some space between them as they will grow in the oven.
  8. Dust generously with icing sugar.  I use a loose tea strainer so that I have more control over where the icing sugar is going.
  9. Bake for 18 minutes.  Allow to cool completely before removing from the baking tray.  Dust with a bit more icing sugar if you have a sweet tooth like me.

Enjoy!

Amazon Associate Links

Most of the baking equipment I used can be found on Amazon, find them here

Choux Buns

Choux buns can seem like a mystic art, but they are actually relatively easy to bake.

This recipe makes 12 choux buns. All ingredients, except the double cream, should be at room temperature.

Ingredients

  • 85g margarine (I prefer to use Pure Soya)
  • 225ml water
  • 100g plain flour
  • 3 medium eggs
  • 150ml plant based double cream (I use Elmlea plant based double cream, available in most UK supermarkets)
  • 100g chocolate (I use Lindt 51% cooking chocolate; as this may contain milk I strongly recommend that you use a chocolate that you know will not affect you)

Process

  1. Prepare a large piping bag with a large round (#10 or #12) piping tip, and two baking trays with parchment paper or silicone mats
  2. Put margarine and water into a small to medium sized saucepan and cook over a low to medium heat until the butter is melted and there are small bubbles around the edge
  3. Take off the heat and add the flour. Mix with a stiff spatula or wooden spoon until the flour is combined and the mixture comes away from the edges of the saucepan with little encouragement
  4. Transfer this mixture to a stand mixer (or large bowl if using an electric whisk) with the paddle attachment, and leave this to cool for 5 minutes
  5. Preheat the oven to 180C (fan assisted)
  6. With the stand mixer on the lowest speed, add an egg at a time. The resulting mixture should be smooth and silky, and you should be able to see the bottom of the bowl easily when passing a spoon/spatula through the mixture
  7. Transfer the mixture to the prepared piping bag. Pipe 12 rounds onto the baking trays (6 on each) and top them off if some is left over in the piping bag. Pop these in the oven, and after 10 minutes turn the temperature down to 160C for 25 minutes. DO NOT OPEN THE DOOR until this time is up or else the choux buns will deflate
  8. When the time is up, take the baking trays out of the oven. Turn the choux buns over and pierce the bottoms with a sharp knife. Make sure not to go through the whole of the choux bun or else cream will leak out. If the buns start to go a bit soft within the first 5 minutes out of the oven, pop them back in the oven at 120C for 5 minutes
  9. Leave the choux buns to cool completely
  10. Pour the double cream into a bowl and whisk with a stand mixer or electric whisk until stiff. Transfer this into a new piping bag with a small round tip (#2 or #4). Poke the tip into the holes on the bottom of the buns and squeeze some cream in. Don’t overfill or else cream could burst out of other parts of the choux bun
  11. Pop the filled choux buns in the fridge to keep the cream cool
  12. Cut the chocolate into small cubes and place in a microwave-safe bowl. Microwave on high in 15 second increments until most of the chocolate is melted. Stir until all of the chocolate is melted. Leave the chocolate to cool slightly before dipping the top of then choux buns in
  13. Put the chocolate topped choux buns back in the fridge until the chocolate has cooled completely and set

Enjoy!

Amazon Associate Links

Most of the baking equipment I used can be found on Amazon, find them here

Victoria Sponge

I love a good Victoria sponge, they always make me think of warm weather and sunshine. The addition of fresh summer fruits can elevate a regular Victoria sponge to something more delectable and decadent.

Victoria sponge recipes are based on the weight of the eggs, so egg size doesn’t matter and you can use whatever you have to hand. Weigh these without shells first so that the weight of the other ingredients is correct.

This recipe will make a single 8″ (20cm) sponge layer. You will need to bake two to make the fully assembled cake. All ingredients, except the double cream and fresh fruit, should be room temperature.

Ingredients

Cake – single layer

  • 2 eggs
  • 2 eggs weight of margarine, plus extra for greasing
  • 2 eggs weight of caster sugar
  • 2 eggs weight of self raising flour
  • 1 tsp vanilla extract – NOT vanilla essence
  • 1 tsp orange extract
  • 1 tsp orange liqueur, like Cointreau (optional, for adults)
  • 1 tbsp plant based double cream (I use Elmlea plant based double cream, available at most UK supermarkets)

Cream Filling

  • 150ml plant based double cream
  • 1 tbsp orange liqueur, like Cointreau (optional, for adults)
  • 1 tsp orange extract

Assembly

  • Good quality berry jam
  • 250g fresh summer berries (strawberries, raspberries, etc)
  • 2 tbsp icing sugar, to dust

Process

Cake

  1. Prepare an 8″ (20cm) cake tin (I prefer to use a springform tin) to ensure your cake doesn’t stick
    • Lightly grease the inside with margarine. Cut a circle of non-stick baking parchment the size of the tin and use it to line the bottom – the margarine on the bottom of the tin will keep the parchment in place. Dust the sides with some flour, making sure to knock off the excess
  2. Set oven to 170C fan assisted and put a shelf in the bottom middle
  3. Put margarine and caster sugar into a bowl and beat them until light and creamy (at a medium speed if using an electric mixer)
  4. Add eggs slowly, making sure to keep the speed the same. Add a tablespoon of the flour once the eggs are added to stop the mixture from curdling
  5. Add vanilla and orange extract, and orange liqueur if using, and mix until combined
  6. Sift in flour and fold mixture together until combined. If the mixture feels stiff, add the cream and continue to fold until combined
  7. Pour mixture into prepared tin and level off with offset spatula or butter knife
  8. Bake for 20 minutes, or until a skewer comes out clean
  9. Allow cake to cool for 15-20 minutes in the tin before removing onto wire rack. For a Victoria sponge, I like to cool the cakes upside-down on the wire rack so that the sponges are flat. Be careful when doing this as the tin will still be slightly warm. Allow the sponge to cool completely on the wire rack
  10. Repeat process for second layer

Cream Filling

  1. Whip the cream with the orange extract, and orange liqueur if using, at a high speed until thick

Assembly

  1. Place bottom sponge on cake board or stand. Cover with a thick layer of jam
  2. Spread summer berries around on the jam. I cut strawberries in half so that they aren’t so bulky
  3. Cover the berries with the whipped cream using an offset spatula, spoon, or by piping it on
  4. Top with other sponge
  5. Dust with icing sugar

Enjoy!

Amazon Associate Links

Most of the baking equipment I used can be found on Amazon, find them here

Chocolate Chip Cookie Ice Cream Cups

There’s nothing quite like eating ice cream out of a cookie cup. It’s a bit like eating ice cream out of a waffle cone, only a bit more childish and decadent. Plus, who doesn’t love the novelty of being able to eat the ice cream bowl?

This recipe will make 6-8 cookie cups. All ingredients, except the margarine, should be room temperature.

Ingredients

  • 125g small chocolate chips
  • 115g cold margarine, cubed (I use Stork for Biscuits because it comes in a block), extra for greasing
  • 80g golden caster sugar
  • 80g light brown muscovado sugar
  • 100g self raising flour
  • 150g plain flour
  • 1 large egg, beaten

Process

  1. Beat the margarine, using a stand mixer or hand mixer, at a high speed until lighter in colour
  2. Add the sugars to the beaten margarine and beat together until well combined
  3. Push down the mixture from the edges. Add half of the flours
  4. Add the beaten eggs and mix until combined
  5. Slowly add the rest of the flours in equal amounts until dough is tacky and doesn’t stick to your fingers if you touch it. You might not use all of the leftover flour
  6. Add the chocolate chips and mix with a stiff spatula or wooden spoon. You could damage your mixer if you use it to mix in the chocolate chips.
  7. On a flat surface, rip off a piece of clingfilm which is about 10cm wider than your freezer drawer/shelf. Turn out the cookie dough on to the clingfilm and form into a thick sausage along the length of the clingfilm, about the circumference of a muffin tin hole. Make sure to not make it wider than your freezer drawer/shelf.
  8. Pop the cookie dough sausage in the freezer for 2 hours to 1 day
  9. Turn the oven on at 175C (fan assisted)
  10. Line the underside of a muffin tin with aluminium foil and grease lightly with margarine. I only do every other ‘mound’ so that the cookie cups are easier to separate when taken out of the oven.
  11. Using a sharp knife, cut the cookie dough sausage into rounds about 1.5cm thick. These need to be warmed slightly before moulding over the underside of the muffin tin, so roll into a ball between your hands and then flatten again (be careful not to warm them too much or the cookie cups will melt too quickly in the oven). Place over the ‘mound’ and smooth the dough down the edges until the dough reaches the flat of the tin. Repeat this for each greased ‘mound’.
  12. Pop in the preheated oven for about 15 minutes
  13. Wait about 15 minutes to cool on the tray then move over to a cooling rack.

Enjoy with your favourite ice cream and toppings!

Amazon Affiliate Links

Most of the baking equipment I used can be found on Amazon, find them here

Chocolate Sponge Cake

This recipe will make a single 6″ (15cm) sponge cake. All ingredients, except the double cream, should be room temperature.

Ingredients

  • Margarine for greasing the cake tin
  • 100g self-raising flour
  • 105g caster sugar
  • 20g 100% cocoa powder – NOT hot chocolate powder!
  • 30g cocoa nibs
    • Make sure these are small; you may have to put them in a food processor to bring the size down (but don’t powder them)
  • 35g cooled espresso
    • I make this in a Moka pot and let it sit until room temperature, otherwise make a cup of black coffee and pour in about 60ml when cool
  • 65g plant-based Elmlea double cream (or another dairy alternative to double cream)
  • 60g sunflower oil
  • 1 large egg

Process

  1. Prepare a 6″ (15cm) cake tin (I prefer to use a springform tin) to ensure your cake doesn’t stick
    • Lightly grease the inside with margarine. Cut a circle of non-stick baking parchment the size of the base of the tin and use it to line the bottom – the margarine on the bottom of the tin will keep the parchment in place. Dust the sides with some flour, making sure to knock off the excess
  2. Set oven to 160C fan assisted and put a shelf in the middle
  3. Sieve all dry ingredients into a bowl and whisk them to combine
  4. In a separate bowl whisk wet ingredients
  5. Add mixed dry ingredients to wet and mix until combined
  6. Pour into tin and cook for 40-45 minutes, until a skewer comes out clean
  7. Allow cake to cool for 30+ minutes in the tin before removing from tin

If you’re not using the cake on the day it is made, wrap it in clingfilm once it is out of the tin and put in the fridge. Double wrap in clingfilm if it is going in the freezer to make sure it doesn’t get freezer burn. Allow the cake to return to room temperature completely before decorating.

I always cut the top off the cake using a cake leveller before wrapping in clingfilm so that it is ready to decorate immediately.

Enjoy!

Amazon Associate Links

Most of the baking equipment I used can be found on Amazon, find them here

Double Chocolate Chip Cookies

As a self-proclaimed cookie monster, it’s often difficult for me to find really tasty dairy-free cookies.  Frequently, dairy-free desserts are also gluten-free, and this can make cookies really crumbly and dry.  My cookies are crisp on the outside and deliciously chewy-gooey in the middle.

This recipe will make around 12 big cookies or 24 small cookies. All ingredients, except the margarine, should be at room temperature.

Ingredients

  • 250g chocolate chips (or chopped up chocolate bar)
  • 230g cold margarine, cubed
  • 160g golden caster sugar
  • 160g light brown muscovado sugar
  • 70g cocoa powder – NOT hot chocolate powder
  • 200g self raising flour
  • 200g plain flour
  • 5g baking powder
  • 2 large eggs, beaten

Why both self raising and plain flour you might ask? Well, just self raising flour would cause the cookies to rise too much, whereas just plain flour wouldn’t have enough rise.

Why both golden caster sugar and light brown muscovado sugar? The muscovado sugar adds an almost caramel-like flavour to the cookies and makes the cookies more gooey, but by itself would make it too sweet and caramel-y.

Dairy Free Swaps

Dairy free ingredients

The chocolate powder, chocolate chips, and margarine are the ingredients that usually contain dairy. I’m so glad I found the Dr Oetker Jumbo Choc Chips; I can be really lazy and chopping up chocolate can be tedious. It does state on the back ‘May contain traces of dairy’, but this is something that my intolerance allows. If you do have an allergy, PLEASE use a chocolate that you know will not cause a reaction.

Process

  1. Beat the margarine, using a stand mixer or hand mixer, using a high speed until lighter in colour
  2. Add the sugars to the beaten margarine
  3. Push down the mixture from the edges. Add half of the flours and all of the baking powder and cocoa powder
  4. Add the beaten eggs and mix until combined
  5. Slowly add the rest of the flours in equal amounts until dough is tacky and doesn’t stick to your fingers if you touch it. You might not use all of the leftover flour
  6. Add the chocolate chips and mix with a stiff spatula or wooden spoon. You could damage your mixer if you use it to mix in the chocolate chips.
  7. On a flat surface, rip off a piece of clingfilm which is about 10cm wider than your freezer drawer/shelf. Turn out the cookie dough on to the clingfilm and form into a sausage along the length of the clingfilm. Make sure to not make it wider than your freezer drawer/shelf. If making smaller cookies, split the dough in half and make 2 cookie dough sausages.
  8. Pop the cookie dough sausage(s) in the freezer for 2 hours to 1 day
  9. Turn the oven on at 175C (fan assisted)
  10. Line a baking tray with non-stick baking paper. I use a silicone baking mat
  11. Using a sharp knife, cut the cookie dough sausage into cookies! They should be about 1.5cm thick.
  12. Pop in the preheated oven for about 17 minutes
  13. Wait about 15 minutes to cool on the tray then move over to a cooling rack

Enjoy!

P.S. want a less gooey cookie? Turn the temperature down to 150C (fan assisted) and bake for 25 minutes. This should make a more biscuit-like cookie.

Amazon Associate Links

Most of the baking equipment I used can be found on Amazon, find them here